
You’re probably paying too much for databases. Not because you’re reckless, but because AWS pricing reads like a tax code. Good news: AWS Database Savings Plans can cut RDS, Aurora, and DocumentDB by up to 35%—without locking you to one instance type.
Here’s the unlock: commit to a steady $/hour, and AWS auto-applies discounts. It covers eligible database usage across services. No more playing Tetris with Reserved Instances all week. No more “who changed the instance family?” blame storm. Just set it, watch it, and keep shipping.
And yes, you can do this without Excel panic. There’s a calculator-friendly path with clear steps. You’ll get the numbers, the math, and a simple playbook you can run in 30 minutes. By the end, you’ll know if a Database Savings Plan beats RIs for your stack. You’ll also know where to start today.
One more thing before we dive in: this isn’t theory. It’s the practical stuff teams use to cut spend in weeks, not quarters. You’ll see where flexibility shines, like changing instance families and sizes. And where RIs might still edge out, for stable, high-capacity single instances.
If you’ve stared at a surprise bill thinking, “But we didn’t even scale this month,” this is your map. Let’s make the discount work like you do—fast, flexible, and low drama.
TLDR
- Save up to 35% on RDS, Aurora, and DocumentDB by committing to a $/hour with Database Savings Plans.
- Discounts auto-apply and flex across families, sizes, and regions for eligible services.
- Use the AWS Pricing Calculator plus 30–90 days of usage to size a conservative $/hour.
- Savings Plans are flexible; RIs can be cheaper for fixed, big, reserved capacity but harder to manage.
- Track utilization and coverage monthly; add small increments as confidence grows.
Savings Plans for Databases
What you commit
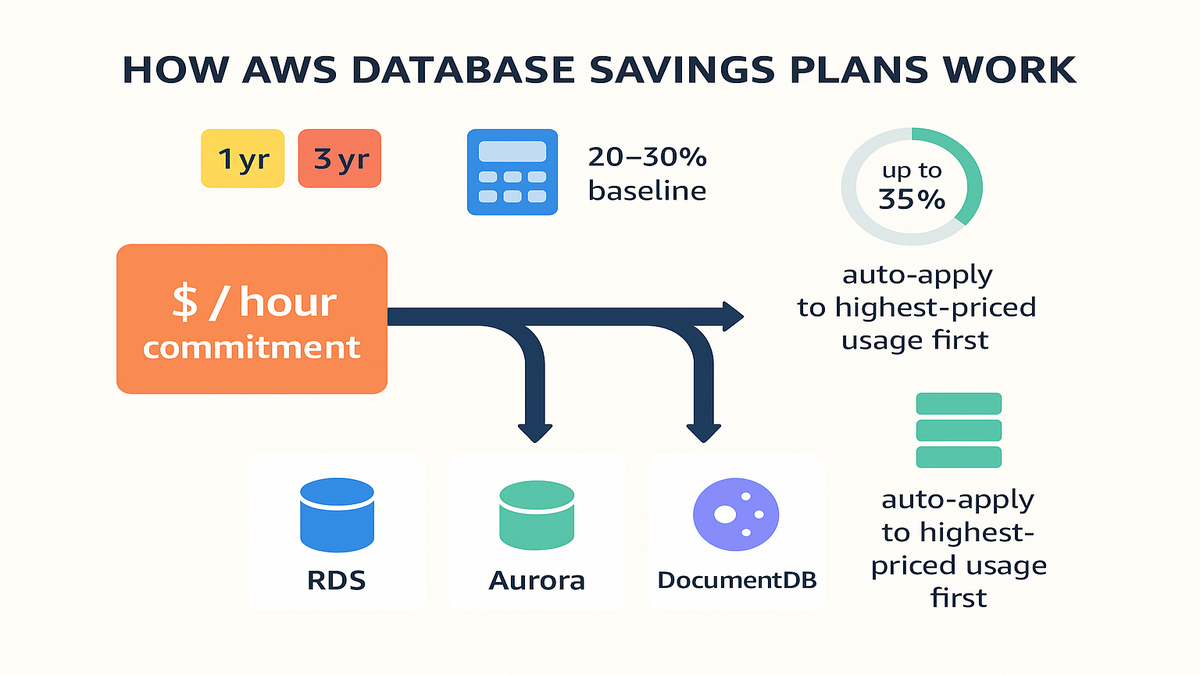
You choose a 1- or 3-year term and commit to a steady $/hour. Think of it like a minimum tab for eligible database usage. AWS bills your commitment first, then any extra at on-demand rates.
- Commitment: $/hour (e.g., $25/hour)
- Term: 1 year or 3 years
- Payment: No Upfront, Partial, or All Upfront
A few practical notes
- Term length: 3-year terms usually get a better rate than 1-year. Only do that if your workload is truly long-lived.
- Upfront choice: All Upfront usually yields the best discount. Partial is a balanced middle, and No Upfront wins on cash flow. The total commitment is the same; you’re just changing timing and effective rate.
- Finance alignment: If your company prefers predictable OPEX, consider Partial or No Upfront. Then track realized savings versus plan each month.
Rules of thumb
- If architecture is changing, start with 1-year Partial Upfront.
- If prod is rock solid and unlikely to change, consider 3-year to squeeze more.
- Avoid All Upfront unless you’re sure about utilization and not cash-constrained.
What qualifies
Database Savings Plans apply to eligible usage for Amazon RDS, Amazon Aurora, and Amazon DocumentDB. The big win: flexibility across instance families and sizes within those services. If you move from r6g.large to r7g.xlarge, the plan follows your spend.
AWS states savings up to 35% compared to on-demand. Actual savings vary by engine, instance, region, payment option, and term length.
Important scope reminder: Savings Plans generally apply to instance compute usage for those services. Storage, I/O, backup, and some add-ons may not be covered. Always confirm eligibility for your exact engine and deployment model. Check AWS pricing pages, especially for newer features or serverless options.
How discounts apply
AWS applies the plan to the highest-priced eligible usage in each hour first. Then it rolls down to cheaper usage. That maximizes your discount without manual work. If your spend exceeds the commitment in an hour, the excess is on-demand.
Example math: If your eligible usage averages $32/hour and you commit to $25/hour, you get discounted rates on $25/hour every hour. The remaining $7/hour is on-demand. If usage dips to $22/hour, you still pay $25/hour. You’re pre-committing, so aim for high utilization.
Pro move: Start with a commitment that covers your stable, 24/7 production baseline. Then layer more as confidence grows.
Track two numbers
- Utilization: How much of your commitment gets applied each hour. If you commit $25/hour and $24.50/hour is used, utilization is 98%—excellent.
- Coverage: What percent of eligible spend gets the Savings Plan discount. If you spend $30/hour eligible and $24/hour is discounted, coverage is 80%.
Reality check scenario
- Weekdays: usage ~ $34/hour, weekends: ~ $26/hour, nightly batch spike: +$4/hour for 3 hours.
- With a $25/hour commitment, you’ll be fully utilized almost all the time. If you committed $32/hour, weekend underutilization rises, which hurts effective savings.
Another pro move: Run a 30–45 day “canary” commitment first. Prove utilization above 95%, then scale up by small chunks.
Savings Plans vs Reserved Instances
Flexibility vs certainty
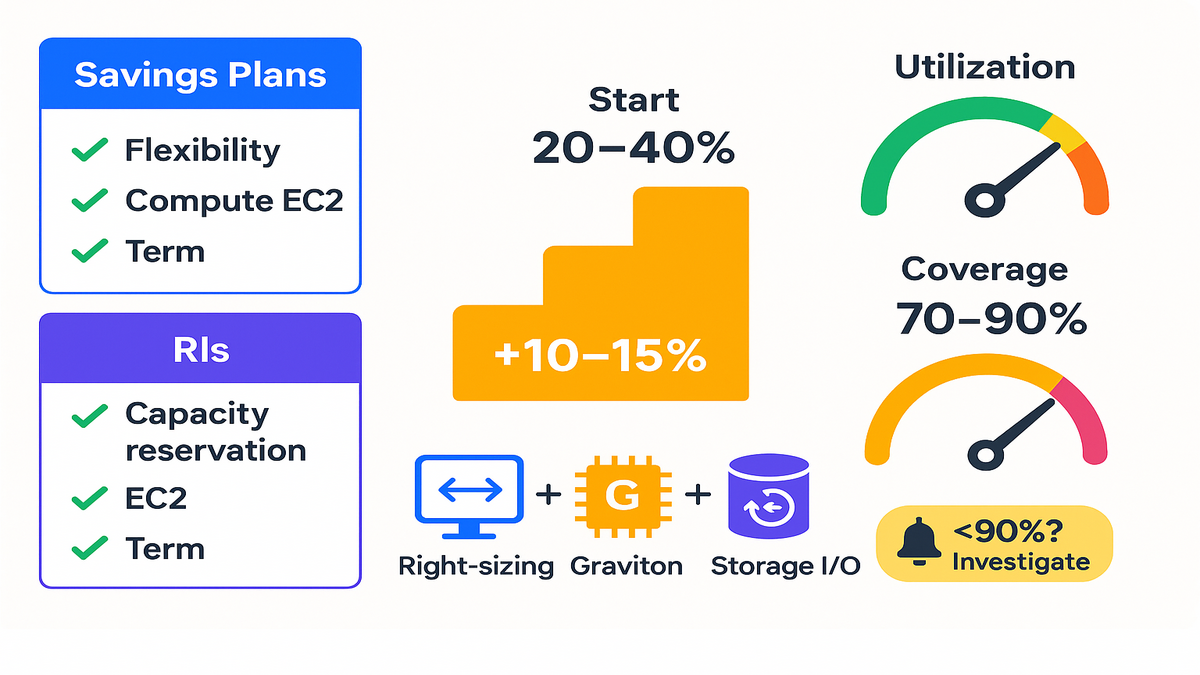
- Savings Plans: Flexible across instance families and sizes for eligible services. No capacity reservation. Great when you modernize, right-size, or experiment often.
- Reserved Instances (RIs): Can be cheaper for very specific, stable footprints. You get capacity reservation in a region or family, but you’re locked tighter.
If your DB workloads are dynamic, Savings Plans reduce the overhead of constant RI management. Think dev and test churn, Graviton moves, and switching instance sizes.
Decision cheatsheet
- Choose Savings Plans if you rotate instance types or right-size often. Also if you expect engine or version migration in 12–18 months.
- Choose Standard RIs if one or two giant, never-changing instances dominate your bill and you want capacity reservation.
- Choose Convertible RIs if you need some flexibility but still want RI-style discounts. The discount is usually smaller than Standard.
- Mix both when prod cores are static, but readers, dev, test, and analytics are fluid.
Pricing math and breakevens
- Savings Plans (database): up to ~35% off on-demand.
- RIs (Standard): Higher discounts for very specific instance and engine combos. Especially with 3-year All Upfront.
- RIs (Convertible): More flexible than Standard, usually smaller discounts versus Standard.
Breakeven test: If your pattern is stable for 12–36 months and you want capacity reservation, RIs might edge out. If you’re changing sizes, families, or engines, Savings Plans usually win on utilization and time saved.
When math meets reality: A team ran two giant, fixed RDS for SQL Server Enterprise instances. They used 3-year Standard RIs for those beasts for capacity and steeper discounts. Then they covered everything else with a Savings Plan. Coverage stayed high while they right-sized dev and moved readers to Graviton.
When RIs still make sense
- You need capacity reservation in a specific AZ or region.
- You have a locked-in enterprise database footprint that won’t change. Think fixed Oracle or SQL Server sizes.
- You’re optimizing one giant instance where the RI discount beats Savings Plan flexibility.
First-hand style example: A team ran steady Aurora MySQL prod at ~95% uptime. They locked a 3-year All Upfront RI for the largest writer node. Then used a Savings Plan for readers and dev or test. Result: best of both worlds—RI for the core, Savings Plan for everything else that moves.
Step-by-Step Estimation
Use AWS Pricing Calculator
You can model database costs in the AWS Pricing Calculator. Pull 30–90 days of usage to estimate an hourly baseline.
1) Export historical usage from Cost Explorer or the Cost & Usage Report. 2) Identify 24/7 prod instances and compute their average $/hour. 3) Model expected changes like right-sizing, Graviton moves, and reader scaling. 4) In the calculator, compare on-demand versus Savings Plan to see savings bands.
Key tip: Anchor your first commitment to the 20th–30th percentile of hourly eligible spend. That guards against underutilization when usage dips.
Get the numbers
- In Cost Explorer, filter Service = Amazon RDS, Amazon Aurora, Amazon DocumentDB. Group by Usage Type or Instance Type to see spend. Switch to Hourly for a few days to confirm the baseline.
- In CUR, join line items for those services, then pivot by hour and product family. If that sounds heavy, start with Cost Explorer. Only go to CUR if you need more precision.
- Note Multi-AZ: For Multi-AZ, your compute baseline is basically doubled for those instances. Make sure your baseline accounts for that steady state.
- In the Pricing Calculator, build two simple scenarios. First, your core instances as-is. Second, apply a Savings Plan at the commitment you’re considering. Compare monthly totals.
Back of the napkin math
- Current eligible spend: $38/hour
- Proposed commitment: $28/hour (1-year, Partial Upfront)
- If the plan yields ~25–30% off on that $28/hour piece, you capture most savings while keeping a buffer.
If monthly eligible hours are ~730, discounted portion is ~730 × $28 = $20,440/month. A 25% average discount implies ~$5,110/month saved, if you keep utilization up.
Seasonality check
- If usage drops to $22/hour on weekends for ~8 days each month, your average eligible spend might be closer to $34–35/hour. A $28/hour commitment stays highly utilized. If you pushed to $34/hour, weekend underutilization starts to bite.
Add a buffer
- Planning a Graviton move? Assume unit prices drop for supported engines. Great news overall, but it may lower your $/hour baseline. Keep commitments conservative until after the migration.
Common pitfalls
- Overcommitting: You pay the commitment every hour whether you use it or not. Stay conservative and add later.
- Ignoring re-architecture: A Graviton switch changes unit pricing. Great savings, but it alters your baseline.
- Mixing ineligible usage: Only eligible RDS, Aurora, and DocumentDB compute counts. Double-check engine and instance details.
- Not tracking utilization: Savings Plans won’t run themselves. Review utilization and coverage monthly.
- Buying in one shot: Ladder your buys. It’s easier to add than undo.
- Missing change logs: Track who changed families or sizes. Then you can explain dips without guessing.
Quote worth remembering: “Buy commitments in smaller chunks and iterate; you can always add more, not less.” That’s a core FinOps best practice echoed by many.
Field Guide
Buy rhythm and guardrails
The worst move is a giant commitment on day one. Instead:
- Buy 20–40% of your 24/7 baseline first.
- Monitor for a month; look for seasonality and release cycles.
- Add 10–15% increments as you gain confidence.
This laddering approach reduces underutilization and adapts to product changes.
Practical guardrails that help:
- Pre-commit checklist: baseline confirmed, upcoming migrations noted, approvals captured.
- Time-box review: schedule a 30-minute review 2 weeks after the buy, then monthly.
- Budget sync: keep finance looped on payment choices and forecasted savings.
Utilization and coverage targets
- Utilization: Your committed $/hour actually used by eligible spend. Aim for ≥95% on average.
- Coverage: Percent of eligible spend getting Savings Plan discounts. Aim for 70–90%, based on volatility.
Monthly ritual: Review utilization and coverage, compare to forecast, and adjust commitments. If utilization dips, pause new buys and investigate moves or shrinkage.
Dashboards that cut noise:
- A simple time series with hourly eligible spend versus commitment.
- A bar chart of top engines and families by spend to spot drifts.
- An alert when utilization falls below 90% for 24 hours.
Architecture tweaks that compound savings
- Right-size: Many RDS instances are over-provisioned by one size. Pair right-sizing with Savings Plans for bigger wins.
- Graviton shift: If your engine supports Graviton, unit cost drops plus Savings Plan is a two-stack win.
- Storage and I/O: Tuning storage classes and IOPS can rival compute savings. Don’t ignore a spiky I/O bill.
Practical extras:
- Reader fleet dialing: Scale read replicas to real demand, not “always-on” max. A smaller baseline plus Savings Plan usually beats a giant fixed fleet.
- Dev or test schedule: Park non-prod overnight and weekends. Savings Plans cover your 24/7 baseline while you grab easy wins.
First-hand style example: A team moved Aurora readers to Graviton, dropped two over-sized dev instances, then added a conservative $18/hour plan. Combined outcome beat 30% off on-demand without chasing 50 different RIs.
What Reddit Keeps Asking
Common threads you’ll see
Search “aws database savings plans reddit” and you’ll see the same questions:
Short answers
- Is this better than RIs if I keep changing sizes?
- What happens if spend dips below my commitment?
- How do I size the commitment without getting burned?
- Does it really cover Aurora and DocumentDB, or just RDS?
Short answers:
- Yes, flexibility is the point—Savings Plans follow eligible spend across families and sizes.
- If spend dips, you still pay the commitment. That’s why you start conservative.
- Use 30–90 days of data, pick a percentile baseline, and ladder purchases.
- It’s designed for RDS, Aurora, and DocumentDB. Always confirm details by region and engine.
Myths vs facts
- Myth: “Savings Plans lock you into a single instance.” Fact: They flex across families and sizes for eligible services.
- Myth: “They cover every line on my database bill.” Fact: They mostly apply to compute; check storage and I/O separately.
- Myth: “You can cancel if demand drops.” Fact: You can’t cancel or reduce mid-term; buy conservative and add later.
Realistic expectations on pricing
“Up to 35%” is the headline. Your actual discount depends on engine, instance, region, and payment option. Three-year terms and upfront payments improve your rate. But don’t let the headline push you to overcommit. The best discount is the one you actually use.
Governance that doesn’t
- Create a small approval flow for new commitments. Slack plus a ticket works fine.
- Track commitments in one source of truth. Use a FinOps sheet or tool.
- Set an alarm for utilization below 90%. That’s your signal to pause new buys.
- Document architecture changes like Graviton moves or Multi-AZ readers. Finance needs to know why the baseline shifted.
Speed Recap
- Commit to $/hour for eligible RDS, Aurora, and DocumentDB to save up to 35%.
- Size with 30–90 days of spend; start at the 20th–30th percentile baseline.
- Savings Plans beat RIs when you need flexibility; RIs can win for fixed capacity.
- Track utilization (≥95%) and coverage (70–90%); ladder purchases in small steps.
- Combine right-sizing and Graviton migrations with Savings Plans for compounding wins.
FAQs You’ll Actually Care About
AWS Database Savings Plans differ
Compute Savings Plans target compute services like EC2 and Fargate. Database Savings Plans apply to RDS, Aurora, and DocumentDB. Both use a $/hour commitment over 1 or 3 years, but each plan discounts only its own scope.
Do Savings Plans include
No. Savings Plans discount eligible usage but don’t reserve capacity. If you need guaranteed capacity for a family or AZ, Standard RIs are the tool.
How do I size
Export 30–90 days from Cost Explorer or the CUR. Isolate 24/7 prod databases. Calculate the 20th–30th percentile hourly eligible spend, and start there. Monitor a month, then add smaller increments.
Can I mix RIs
Yes. Many teams use RIs for a few rock-solid, high-cost instances where capacity or a specific RI discount matters. Then they use Savings Plans for everything else. That hybrid often maximizes real savings.
What if my spend
You still pay your $/hour commitment every hour of the term. That’s why conservative starts and monthly utilization reviews are non-negotiable. If usage is seasonal, keep commitments lower and ride on-demand during troughs.
Where do I see
Use AWS Cost Explorer and the Savings Plans utilization and coverage reports. Set CloudWatch or Cost Anomaly Detection alerts so you don’t find issues at month-end.
Can I cancel or modify
No. You can’t cancel or reduce a Savings Plan during its term. You can always buy more plans later, which is why small, iterative purchases are smart.
Do Savings Plans cover
Generally, Database Savings Plans apply to compute usage for eligible services. Storage, I/O, and backups are billed separately. Check the pricing pages for your engine and region.
How do Savings Plans
You’ll see line items for recurring plan fees and covered usage. Discounts apply automatically each hour to eligible usage. Any excess runs at on-demand rates. Cost Explorer’s reports make this easy to visualize.
Savings Plan Playbook
- Pull 90 days of database spend in Cost Explorer; filter RDS, Aurora, DocumentDB.
- Compute hourly eligible spend and note the 20th–30th percentile baseline.
- Model a 1-year Partial Upfront commitment in the Pricing Calculator; compare scenarios.
- Buy an initial commitment covering 20–40% of the baseline.
- Set monthly checks for utilization (≥95%) and coverage (70–90%). Add 10–15% more as stability proves out.
- Log changes like right-sizing and Graviton moves. Re-run the calculator before buying more.
Small extras that help
- Create a lightweight approval ticket with baseline, commitment, payment option, and expected savings.
- Add an alert for underutilization so you catch changes within 24–48 hours.
- Keep a one-pager of commitments and renewal dates so you never scramble at term end.
Here’s the bottom line: you don’t need a PhD in cloud economics to stop the bleed. Database Savings Plans match how you really run today—moving targets, evolving architectures, constant change. Start with the math, stay conservative, and layer commitments like a pro. Do that, and you’ll bank real savings without RI babysitting.
References
- AWS Savings Plans overview:
- Database Savings Plans (AWS page):
- AWS Pricing Calculator:
- Amazon RDS pricing:
- Amazon Aurora pricing:
- Amazon DocumentDB pricing:
- AWS Cost Explorer (what it is):
- Savings Plans utilization and coverage:
- AWS Cost and Usage Report (CUR):
- Savings Plans User Guide (docs):
- AWS “What’s New” – Database Savings Plans announcement:
“Flex matters more than the last 5% of discount. The best plan is the one you actually use.”